
3D Display Introduction
Q: How do I use the 3D Display module in TAP?
A: For TAP 4.5.932 systems with a Maintenance Subscription date of October 10, 2003 or later, the 3DDisplay function is available as a separate module in TAP.
Note that the 3DDisplay function ("3DD") requires the installation of Microsoft operating system extensions, the .NET Framework and the DirectX graphics software. If you are not sure if these components are installed on your machine, you can download the test file CHKNETDX.exe and execute the file to display a message about the existence of .NET and DirectX. If the components are not installed you will be prompted to install them the first time you run the 3DD function from TAP. (The installation files are copied to your hard disk when you install TAP.)
Also, the 3DD function requires the presence of video hardware acceleration, common on most recent PCs. If you have the Microsoft .NET Framework installed, you can use a test program from our web site to test for the presence of hardware acceleration. Download the file and unzip it to get the test file ("Hardware Acceleration Test.exe"). Execute the "Hardware Acceleration Test.exe" file from the Start|Run menu for a report on the graphic capabilities on your machine.
Start the 3DD function from the TAP menu by clicking the "3DDisplay" button:
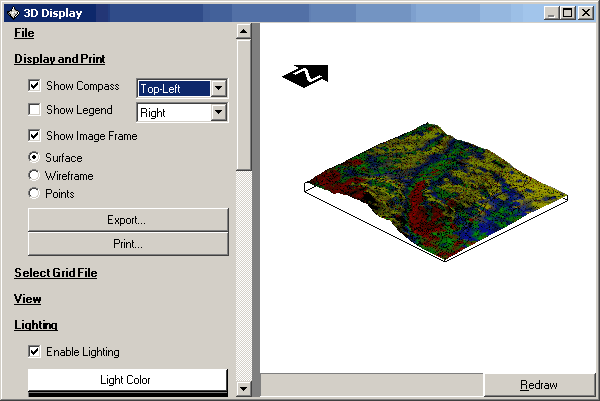
When you launch the 3DD function, the 3D Display form is shown:

The demo mode of the 3DD function may load a sample graphic automatically. If the image is not loaded when the form is displayed, you can load the demo sample.
Opening a File Created with 3DD
Click the File menu on the left side of the form:

This will open the File functions. Click the Open button.
The demo file is in the folder SW3DD under the folder where TAP is installed. Select the "DEMO Sample 3DD.sw3dd" file:

Depending on the configuration settings (discussed below) the image may not be automatically displayed. The Redraw button will be highlighted indicating that the drawing has changed and needs to be redrawn.

Click the Redraw button.
The image will be displayed:

The demo sample image shows the 3D plot of topography in the Denver area, with the surface colored to show field strength values computed in TAP. The surface also includes a bitmap of a topographic map showing roads, towns, and other features. The next section discusses configuring the drawing. The following section describes how the drawing is created.
Configuring 3D Drawings
Click the View menu to open the View functions for the drawing

(Note that you can close menus that are open by clicking the menu heading. The scroll bar to the right of the menus enables you to scroll up or down among the menus.)

(If the drawing does not automatically refresh to show the change in pitch, click the Redraw button.)

Click the Lighting menu to display the lighting functions:

Note that the Lighting functions extend below the bottom of the form. You can scroll down to expose the lighting functions, or you can click the View menu to close those functions.

The Lighting functions determine if and how light would be reflected from the surface displayed. Often, different lighting settings can help make the differences in the topography clearer on the drawing.
Once you understand the basic idea of the lighting function, you should experiment with various combinations to determine which settings will work best with different types of images you create.
Click the Coloring Scheme menu to display the options for coloring the image.

The current settings for the demo image show the selection of "Data File Gradient", with four levels (0, 10,20, and 30) with the corresponding colors.
Four coloring schemes are available:

Most images consist of two different "grid" files: one file for the topography elevations, and another file containing the "data", such as field strength values in the area. (Note that the legend on the drawing image contains descriptions of the colored levels rather than the actual numerical values. This is accomplished in the Legend function under the Display and Print menu described below.)
The selection of the coloring scheme will depend on the type of data you are using and the style of presentation you want.
The Add Color button is used to create a new line where you can enter a value and double-click the color box to select a color. Note that when you add or change a value the list is automatically sorted.
The "X" button to the right of each line can be used to delete that line.
The Boundary File menu contains the "Add Boundary File" button to enable you to add .BNA files to the drawing.

The Redraw menu enables you to set the options for refreshing the image.

When "Quick drawing only" is selected, the image will automatically be refreshed if a change does not require the image to be rebuilt, which can take a long time, especially if you're using a high-resolution topo data or field strength grid file. Changes that require rebuilding are:
changes to the coloring scheme
changes to the grid file
loading a boundary file
changes to the image overlay
This means that the user can freely change compass, legend, display, view, lighting, and boundary file drawing schemes while enjoying automatic refresh.
By default, 3DD _always_ loads with "Quick drawing only" as the default.
To create a 3D image, open the 3DD function by clicking "3D Display" under the File menu:

Begin by clicking the "Select Grid File" menu on the 3D Display form:

This menu enables you to select the topographic data grid file to use for the image.
Click the Load button, and you will be prompted to select the grid file to use:

For this example, select the "SAMPLE Topo Data.Grd" file in the DEMO SAMPLES folder. You can create topographic grid files for other areas in TAP.
The file will be loaded, and the Redraw button will be highlighted to indicate the drawing has been changed and needs to be updated:

Click the Redraw button to display the image:

Size the Drawing
Click the View menu to resize the view of the image:

Change the Width value of the image to a larger number, such as 200.

Click the highlighted Redraw button to update the image:

Set Redraw Option
You can eliminate the need to click the Redraw button on changes by setting the Redraw options in the menu:

Select the "Quick Drawing Only" option. This will update the drawing when you make changes that can be displayed without rebuilding the entire drawing:

Select the "Display and Print" menu. Click the Surface option. This switches the image from a "wireframe" of X and Y lines, to a solid surface that will better illustrate several other features, such as the Color Scheme, Lighting, etc.:

Set Single Color Drawing
Click the "Color Scheme" menu.

With the "Single Color" option selected, double-click the black color bar to open a color selection form. Select a color, such as green, for the single color to display on the image:

Click the "Lighting" menu:

Click the "Enable Lighting" checkbox to add the effect of a light source to the image:

Set Elevation Gradient Coloring
To change to coloring option to show different colors for different elevations on the topographic grid image, return to the "Color Scheme" menu and select Elevation Gradient:

With the Elevation Gradient option selected, the elevation value(s) to use and the associated color for each value is displayed:

Click the Add Color button to add two more colors:

You can hover the mouse over either the elevation file filename in the menu and a tip will be displayed showing the range of values contained in the file. You can set the elevation values to fit the range in the file to display the levels that are of interest to you.
Set the elevation values and colors as shown:

When you click the Redraw button, the changes will be applied to the image:

Set Field Strength Gradient Coloring
To add field strength information to the image, in the "Coloring Scheme" menu, select the "Data File Gradient" option:

Click the Load button to select the grid file that contains the field strength values you want to show on the image:

For this example, select the "SAMPLE Coverage Study.GRD" file in the DEMO SAMPLES folder: You can create field strength grid files from coverage studies for other areas in TAP.

You can hover the mouse over either the filename (topo or field strength data) in the menu and a tip will be displayed showing the range of values contained in the file. You can set the field strength values to fit the range in the file to display the levels that are of interest to you.
Change the Color Scheme levels (which now represent field strength in dBu from the coverage grid) as shown. Add another level with the Add Color button, and set the values and colors as shown:

When you click the Redraw button, the image will be shown with the field strength values indicated by the colors:

Click the Image Overlay option: (If you are not currently connected to the Internet, please skip this part of the demo.)

Click the Download button. You will be connected to the Microsoft Terraserver™ server and prompted for the type of file you want to download:

Select the "Topographic Map" option in the 32 Meter resolution and click the "Retrieve Image" button. A progress bar will be shown on the form. When the download is complete, the image of the USGS map for the area defined in the image will be displayed:

Click the OK button.
As you become more familiar with downloading the overlay maps you can try different map Themes and Resolutions. Note that the maps are spliced together by the Terraserver function, so sometimes white lines may be visible between different map sections.
You will be prompted to specify a file name to save the image. Enter a name such as "SAMPLE Overlay.bmp." If that file already exists, enter a different file name, such as "SAMPLE Overlay 1.bmp"

When you click the Redraw button, the image will be updated with the map overlay:

Set Display Options
To set the legend and other options on the image, scroll up to the "Display and Print" menu:

Check the "Show Compass" box and the "Top-Left" option. The image will be updated to show a directional arrow pointing North on the drawing. The arrow will rotate with the image if you change the Roll or Pitch orientation of the image under the View menu.
In the "Display and Print" menu, click the "Show Legend" box and select the "Bottom-Left" option. The legend configuration options will be displayed.

To prevent real-time updating of the image as you make changes to the Legend, go to the Redraw menu and select the "Manually" option. (If you are using a machine with a very fast processor and graphics acceleration, this may not be necessary.)

Then return to the "Display and Print" menu and set the Legend values as shown:

Note that you can resize the menu area by right clicking the mouse on the vertical separator bar between the menu and the image:

After entering the Legend settings, you can resize the menu again as shown below.

You can change the title for the Legend:

(Note you can also change the other headings in the Legend, such as the "Coloring Data" or "Grid Data" headings shown above.)
When you click the Redraw button, the image will be displayed with the legend.

You can change the size of the Legend by selecting or unselecting items on the menu. For example, if you uncheck the boxes by the "SAMPLE Coverage Study", "Name: Sample Topo Data.GRD", and "SAMPLE Overlay" labels, only the field strength information will be displayed

You can also resize the 3D Display window. The Legend size will remain essentially the same, and you can use the View menu to enlarge the image to get the proportions you want:

|
|
Copyright 2003 by SoftWright LLC